Posted in Zentangle

Playing with Color

New approach today– following are the surprises that experimenting with different types of color media can bring. Today I used the German-manufactured Coliro Pearlcolors by Finetec GmbH.

These are not inexpensive, but they are well worth the price.

Today is also a rare one for me: a day in which Tangling inspiration did not come. So I took out some new watercolors and started by making swatches on the three official colors of Zentangle tiles to see how they differ depending on background color. Most watercolors tend to have a bit of transparency to favor light. That is, they let some of the color of the paper through. The colors I used here are opaque–no paper color shows through. Yet, the colors surrounding the swatches make the paint colors look different. A small part of the reason is the pearl essence of these paints. The other, greater reason deals with how our eyes perceive color, and I am not qualified to get into that explanation.

In this photo, taken in natural daylight, all the colors were applied to the tiles in exactly the same order. Yet, the best representation of the colors is on the black tile. If these were a clock, you can see the lilac color on the black tile at 1:00; on the other tiles, that color looks silver (on tan) or pale tan/warm gray (on white). The differences are a bit different “in person,” but not by much.

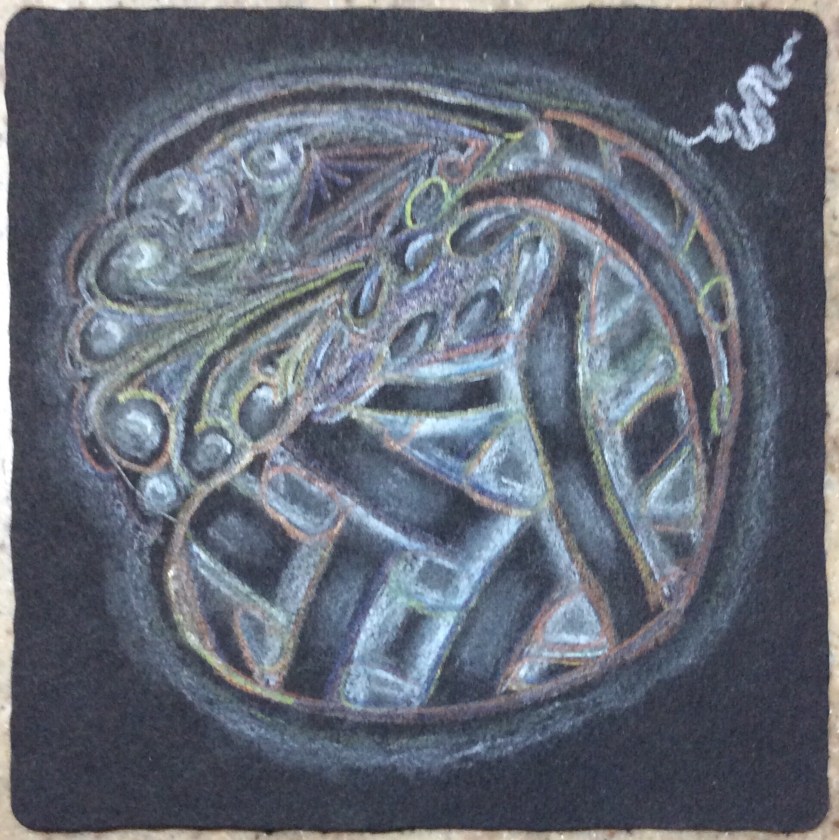
Making the swatches gave me an idea: Today I would use a few of these paints to create color areas on a tile, and then used those areas in place of a graphite string to tangle some patterns.

The colors here are red violet, blue silver, and blue green.

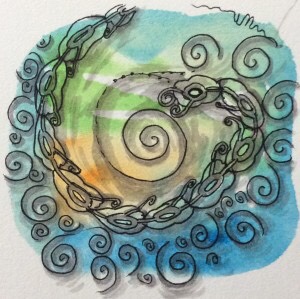
It took forever for this tile to dry, but here are the boundaries set by the colors. By the way, these pearl colors were harder to apply to the tile than when I was doing swatches. I tried to use the paint as washes rather than painted areas. For some reason, this caused the colors to gather together, like oil does on top of water. Also, I found I could use only the darker colors because of the white background almost absorbs the lighter ones and makes them invisible.

Next decision: tangle over the colors, or tangle a “broken” pattern around the colors? Well, there was very little white left on the tile, so that left tangling over the color areas, using a white gel pen over the blue silver because I suspected black ink would be invisible. Maybe brown ink would work over the blue green area.

What surprises this tile had in store for me! Nothing worked as I thought it would: the white did not show on the dark background of the blue silver at all without help from black ink; ThemMicron brown and black pens worked differently than I expected on all the colors. The pearl paint simply changed the rules on me. Result:

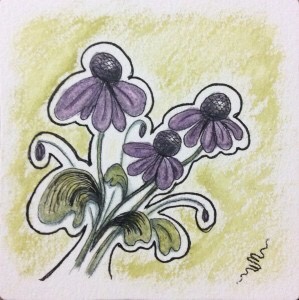
Black ink was needed on the silver, lightened the background colors, and softened the red violet. The beautiful green disappeared with brown ink in the upper left, leaving only a hint of green tint; but brown merely softened the background green of the lower right area; the black enhanced the outline of the red violet, but brown brought out the red and faded the violet, making the color background look more like a red wine stain.

It’s one of the things I love so much about experimenting with colors and standard media–one never knows quite how something new will turn out until one works (OK, plays) with the new. The more I play with color, the more I learn. I especially learn how little I understand color in media and on a variety of surfaces.

Play with your colors and surfaces and find your own surprises. It would be great if you shared your experiences in the comments area, including pics of your results! Zentangle, after all, is not merely for meditation or for art, but an experience to share in a safe community.

Until next time…

Happy tangling!

Dr Ellie, CZT

Posted in Zentangle

Fixing focus on busy tiles

The longer I tangle, the more I believe the Zentangle Method®️ is becoming more of an art form and less of a meditative mindful experience. When in the right frame of mind, Tangling becomes not only meditative as I mindfully draw one line or curve after another, but it has become a way to come to terms with stuff in my life, especially the less than positive or happy stuff. To me, it becomes almost like prayer, but with honest reflection, and often possible sets of solutions.

Most Certified Zentangle Teachers (CZTs) feel as I do–that Zentangle should remain a meditative Method, using mindfulness in tangling, and giving the heart and spirit–and, of course, the mind and body–a bit of calm and respite in a chaotic world. Tangling helps one focus on the patterns, which later translates into focus on tasks and activities. And it is focus that this post is all about.

Today a new technique came to my mind for focusing on specific elements of a rather cluttered looking tangle. The process occurred to me as I was tangling a piece that started out as a good idea, but then became “muddied”. What I mean by that is that suddenly I could not easily discriminate one type of “leaf” from another. I was taught two ways of making elements stand out–1) thicken the outline or heavily shade the form, or 2) aura the form to make it stand out. Well, in the middle of a muddle, adding an aura is almost impossible. And if the forms are intended to have equal ‘weight’ in the design, heavily shading one causes the one next to it to melt into the background. Neither was what I wanted, and it was too late to aura. So what to do?

Let me show you the result (remember, this was a practice and not intended for sharing, so don’t laugh, please).

I can’t blow it up any larger, probably because I have too little space on my iPad, but even at this size, you can see each individual element–some behind others, and some simply sharing the spotlight in an area, as though each leaf were equal there. You might also notice that as borders are crossed, the petals change. They may go from white to black, or to checkerboarded, or half white and half black, or even tangled with printemps (the spiral-like figures inside leaves or outside as background. That is because my “string” divided sections into “pattern areas.” And all that is what made the work look completely cluttered and blob-like. Wish I had thought to take a Before photo, but it’s well after midnight, and I just didn’t think of it in time. But here is how I separated all the leaves without touching the overall design.

First, I outlined each leaf with a 08 Gelly Roll white gel pen. The white ink in this particular pen is opaque enough to cover black if used slowly and carefully, without a lot of pressure on the pen. In a few cases, I outlined inside the original shape to give it better visibility so it would not melt into an adjoining leaf.

After allowing the white ink to dry–it takes about a minute, but here in humid St Maarten, it could take longer, so be patient–I outlined the shapes again in black ink, as much on top or tight against the white ink. I was surprised by how much this process drew out the individual petals, especially from busy background areas.

Since black ink over white gel ink takes a while to set and dry, I waited some more.

Once I was sure the inks had dried completely, I used the graphite drawing pencil (softness 2B) to push the background where it belonged–in the back. I used a fairly heavy hand to darken the background as much as possible, taking care not to get graphite on the black portions of any leaves. Remember to use more side than point as you are doing this. Next, use a tortillion or blending stub or even a cotton swab to spread the graphite into the background and even it out.

Lastly, I shaded my petals as usual, applying graphite to the outside for depth and shadow, and to inner areas to give them dimension. Don’t get too carried away or you will create a second blob. For the most part, shade these areas as you would if you didn’t have the darker background. You will know if you need more shadow, so add several lighter coats rather than one thick and heavy coat.

And voila– a vastly improved tangled piece, with the focus back on your petals, bringing them forward by letting them stand out.

This can work whenever your items blend instead of separate. I got the inspiration for this from a book by Eni Oken’s, who has a beautiful blog and sells wonderful books on drawing techniques specific to tangling. I only have a few, but they left an impression on me that allowed me to take things a step in another direction. As you gain experience, it is amazing how your mind focuses on using techniques learned for one thing and applying them in a whole new way. My inspiration came from Eni’s book on making white seem to sparkle on black tiles.

Hope this helped.

Happy Tangling!

DrEllieCZT

Posted in Zentangle

Valentine classes 2019 preparation

Most CZTs –that’s Certified Zentangle Teachers — practice what they plan to teach. Usually we practice a lot. This year, I thought it might be fun to tangle on wood ornaments instead of paper. So I came up with these.

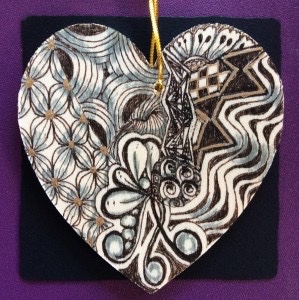
All but one of these figures are painted and tangled on both sides. The one in the second photo–with the gold hanging cord–is tangled only on the front, as the wood on the back is so beautiful.

The reason for the stars is that everyone is special–a real star!–on Valentine’s Day.

These were put together quickly as an experiment of both the quality of the wood and the coverage of my paints. The ornaments were not expensive, and I used student grade acrylic paint for the backgrounds. Acrylics dry pretty quickly, and the paint tubes were small enough to allow me to vary colors, as well as get to tangling quickly. For the two-sided items, by the time I finished painting one side of a second item, the first was dry enough to flip over to paint the back. I painted each side a different color and tangled with different patterns so that I could turn it to fit my mood at a given moment.

Each of the patterns tangled on these ornaments are ones that can easily be learned during the first two beginning classes. Realistically, once you learn the first two tangles—Crescent Moon and Hollibaugh—the rest of these are easy to learn and use creatively.

Since most of the hearts don’t have holes, I will drill them before class. If you give me a color preference or two, I can paint a heart, Star, or both for you before class.

Let me know if you are interested. If you live in St. Martin or Sint Maarten–or plan a visit–leave me a message that you are interested. I will contact you with times, dates, venues, and expected cost of class depending on venue but including materials and snacks. And if you buy or order official Zentangle supplies through me (check out Zentangle.com), you save shipping costs and Florida taxes. We islanders understand that last one. 😁 I’m not allowed to undersell the official prices, but at least I can save you money on orders totaling $25 or more.

FYI. Here is my favorite heart so far.

Sooo easy to tangle, too!

Until next time,

Happy Tangling!

Dr. Ellie, CZT– the island’s only CZT!

Posted in Zentangle

Zentangle®️ Project Pack 4 (Spinner): Where to buy it and get instructions for tangling the project

Yesterday, I completed 12 tanging days on a Zentangle®️ project. The project, which can be purchased on the official Zentangle web site (Project Pack page), uses the tag #PP04 on the Mosaic app, in the official Zentangle newsletter, and in various other venues. Each project pack contains all the materials needed to create the project, from appropriate or special tiles to pen, pencil, and other basic supplies.

Almost done, but still needs some finish work.

Project Pack 4 (or PP04) contains two 9-3/4″ spinner tiles, spinner device, two watercolor pencils, a good quality paint brush, a Micron 01 pen, a small Zentangle graphite pencil, and a tortillion (or blending stump). A video series on YouTube instructs you from tile preparation (ironing the creases from the tiles, coloring in the wedges of the spinner tile, directions for tangling the patterns, etc.) to finishing off your tile and inserting the spinner. You can find the Preparation Day video here.

One of the best uses for the completed spinner tile is to help me select patterns to tangle on days when I just can’t get started. There are days when no tangle comes to mind.

Another use for the spinner is for on-the-spot tangling suggestions during an advanced class. It can be a fun way of selecting patterns to learn, if a tangle has not been used before; or just playing with sets or individual types of patterns. For example, the spinner can be used to select a border to use during tangling. It may be a pattern that would not come to mind on its own. After all, there are over 50 tangle patterns on the wheel.

Rather impatiently, I am waiting for the post-Project instructions. I don’t want to jam the spinner into the spinner tile the wrong way, making it non-functional. I also want to cruise the Mosaic app to look at other tanglers’ embellishments for inspiration on tangling the center and other undecorated areas. I already added Mooka and ‘Nzeppel to opposite corners.

Meanwhile, I am about to start on the second spinner tile, using brighter colors and tangles of my own choice.

Happy Tangling!

DrEllieCZT

Tangling from the beautiful Caribbean island of St. Martin

Posted in Zentangle

Promise to my class at MHF, part 2 of 2

Hello, Class!

Let’s finish that first tile. If you lost it, don’t worry. You can tangle on any paper, with any very fine marker type black pen, the darkest regular pencil you have or a 3B graphite drawing pencil, and a tortillion ( blending stump). At class, you used a black Pigma Micron PN pen with a .45mm tip and a General’s 3B graphite pencil. The tile is 100% cotton fiber watercolor paper. Instead of a blending stump, you can use a Q-Tip or other swab, or you can search YouTube for a video on how to make your own blending stump.

Here is where we left off, with Crescent Moon and Hollibaugh. For a quick refresher, click here.

Today, we will add the tangle patterns Bales and Tipple in the two remaining spaces.

(First, take a few deep cleansing breaths and relax all your muscles, especially the ones in your hands and arms.)

Bales is a grid pattern. That means it is worked in a grid.

Some examples of grids used in The Zentangle Method®️

Grids can have all sorts of shapes, but we will start with the simplest one that is just lines going across and up and down.

The corner is where I added my simple grid. It’s not a full grid, but I wanted to show how we can use the under or behind technique of the Hollibaugh pattern with other patterns, too.

The Bales tangle, or pattern, can be drawn using the following step-out directions. There are several ways to draw the basic Bales pattern, but this is the one I use most often. It keeps my hand and pen moving in the same repetitive stroke, and so has a calming effect on me as I draw.

Now I am ready to fill my grid with Bales.

Before I shade this section, I will tangle the second pattern, Tipple, in the last unused space.

Here is the step-out for how I tangle Tipple. There are many ways to draw this pattern. The orbs can be all the same size, or all different sizes. Tipple orbs can be drawn in rows, in spirals, in rings, or randomly. The most important thing is to be mindful of how you draw the orbs so they are closed where you started them, and as close to round as you can make them. My choice today for drawing Tipple starts in the center of the space.

Notice that in the fourth step I went back and added small orbs in the spaces formed between circles or along the border. It is perfectly OK to draw half orbs along borders, too.

Here is how Tipple looks when added on my tile.

Finally, let’s shade Tipple and Bales. Starting with Tipple, pick up your graphite pencil and, using some of the side of the tip, lay a heavy border of graphite around the inside boundary of your drawing space. Then, using your tortillion and small, light circular motions, “pull” the graphite from the border into the space. Like this.

For Bales, use your pencil to make a large graphite dot where the “petals” touch. Using your tortillion with the same light, circular motion, draw out the graphite about 1/4 of the way along the petals. Like this.

When you are finished, your tile will look something like this–although you may have chosen to put your tangles in different spaces.

And you are done! Congratulations on completing your first Zentangle tile! Take some time to admire your work. Don’t critique it; there are no mistakes in Zentangle.

Feel free to share your results in the comments section of this post. I would love to see how you did, as would my readers. If you have any questions, the comments is a good place to put them. I usually respond the same day, as WordPress lets me know when a comment is waiting for me.

Until next time, whether in a class or here on my blog, Happy Tangling!

DrEllieCZT

Tangling from the wonderful island of St. Martin, in the country of Sint Maarten

Posted in Zentangle

Promise to my class at MHF, Part 1 of 2

Last week, my class at MFH was much shorter than expected. It seems two activities were scheduled for the same time. So we got through only half of a first tile. Thankfully, we did the two foundation patterns: Crescent Moon and Hollibaugh. I promised to include the remainder of the tile here on my blog. But first, here is some beautiful creative work that came from roughly half an hour of a first class.

Now, I would like to review what we already did.

Using the pencil, we drew: Corner dots, a border (connecting the dots), and a string (Z) to divide the tile into smaller areas in which to tangle.

Next, we chose one of the four sections formed by the zed and border–or any created space–and drew half-moon “ladybug” shapes. The ladybugs were filled in and a halo (that we tanglers call an aura) was added along the curved edge. Then we aura-ed again. And again… When we ran out of aura space, we shaded with the pencil and the tortillion (a paper stump that we use to smooth the graphite from the pencil and spread the graphite out for a shadow effect).

After Crescent Moon, we used a different area created by the zed and added a pattern called Hollibaugh. Hollibaugh is an important pattern because it shows us how to draw “under” or “behind.” Hollibaugh can look like construction boards that are in a scattered pile, or a combination of straight and curved figures that are piled loosely one atop another. I chose a long area in which to tangle Hollibaugh. Then we shaded to make the first few “boards” stand out more and help with the illusion of under or behind.

And that’s when class came to an end.

Before everyone left, I promised to continue the “first tile” lesson on my blog space. And we will continue in Part 2 of Promise to my class… Part 2 will be published later tonight.

Hope you enjoyed this review of what we did complete.

See you back here soon!

Posted in Zentangle

Quiet day…

Today was the first quiet day–afternoon, actually, but still quiet–that I have had in quite a while. I am finally happy with my temporary work space setup, and continue to await construction completion and furniture delivery. But this afternoon…

This is the first experimentation I have done in quite a while. I used a Magic Pencil (available at many art stores and at Amazon), which changes color as you draw. I’ve done a few of these in the past on white tiles, but this is the first time I tried it on a black tile.

For the shading/highlighting, I used General’s Charcoal White, a sort of white pastel type pencil that is the “official” whit shading pencil of the Zentangle community. Despite its versatility when used with other media, I found it difficult to use as effectively as I would have liked with the very waxy Magic Pencil. As I said, an experiment. For two reasons 1) to test hoe the two pencils interact; and 2) to ease my way into using black tiles again.

Black tiles are great until you draw your first white Gelly Roll pen on it. We are used to seeing black ink on white paper, but less often see white pen on a black surface. Thus, originally, it took me many months to feel brave enough to tangle on black tiles. So I deliberately purchased a big box of the tiles. The moment I had lots of them, my fear disappeared, and I was drawing all sorts of beautiful designs while experimenting with several brands of white gel pen. The moment I found my perfect combination (a fine-line Angelic gel pen), I took to black tiles like s fish to water.

After Hurricane Irma, when I had fewer supplies than I was used to (I thought all were lost during Irma, but was flooded with donations from the Zentangle community), my fear of tangling on black tiles returned in proportion to the decrease in my supply of these tiles. For me, it must be the knowledge that I could “ruin” lots of black tiles and still have many more left to explore.

I think I spoke in previous posts about the generosity of the Zentangle community (especially of Zentangle’s HQ and many of the CZTs (Certified Zentangle Teachers) and regular tanglers from the Zentangle Mosaic app (available in free and full subscription forms from Google’s Play Store for Android devices and from the Apple Store for iOS versions for iPads and iPhones). They sent tiles (mostly white, and in various sizes and shapes), as well as Micron pens, Zentangle and other B3 drawing pencils, sketch pads, colorful Prismacolor Pencils, watercolor pencils, color Microns, color staining tissue, watercolor sets– well, everything and anything anyone has seen me use on the app. One CZT, @JodyGenovese, even sent me river rocks to tangle! It seems the community loved my color-touched tiles as much as (more than?) my black ink on white paper tiles.

Alas, I finally had to break down and buy a box of black tiles again, even though I waited until we reached the UK. And I did take advantage of those black tiles again! Unfortunately, there are only so many supplies you can cart around the world, so many donations and personal purchases were shared as I traveled, and before returning to Sint Maarten.

It took me months to get back to my island home (St. Martin island) and discover that many of my blank tiles and tangling supplies were in great shape after Irma. As Irma was threatening to bear down on us, I stored as many raw paper and pen supplies as I could in watertight plastic storage containers. I doubted that they could survive a hurricane of Irma’s strength, but the boxes had been expensive enough when I bought them, and I figured my supplies had the best chance of surviving in them. Well, as unpacked or paper box packed items and books turned to pulp around these boxes, and the Irma-given skylight in the ceiling let in all water possible, the items in the boxes survived! Among the supplies were many black tiles and white gel pens and pencils.

It took a while longer to set up a quiet place for meditative tangling, but a few days ago I succeeded, and drew my first white on black tile in ages. That’s the one featured. I was afraid I had lost both my passion for tangling and my ability to produce creative tiles, but I learned with this featured tile that maybe I just need more practice–maybe start at the beginning again– to regain my confidence as well as my meditation abilities.

Sometimes all I need is a bit of encouragement from the wonderful people on the Zentangle Mosaic app, and a stack of black tiles, to find my niche again.

Thank you to all who helped with stuff and with emotional support during a very trying period of my life. I am all set now to go out into the community and volunteer to teach with free supplies to community groups who continue to help those in need, whether children who need to learn to sit still for 15 minutes, or adults dealing with serious health and post-Irma trauma issues. The Mosaic community has provided me with so many supplies to share that I needed extra suitcases and several parcels to bring supplies home with me to share with those in need. I need to buy a few items where Irma shorted me, but I have plenty of supplies to get started here in Sint Maarten (the Dutch side of St. Martin, where my home is). One school has already asked me to teach it’s teachers so they can pass on the anxiety reducing Method to their students. Other organizations are considering. Other groups are putting me in touch with yet more groups. I hope to be really busy soon, and leave the house and contractors to themselves and my Cujo-wannabe dog. Sharing the Zentangle Method. Rings me incredible joy and peace. I want to share that with my ravaged community as we all pitch into the rebuilding effort.

Happy tangling!

Posted in Zentangle

Tangling and Oil Painting

Tonight, I did something different and fun. I attended a sip’n’paint event to help sponsor talented SXM (Sint Maarten) kids to travel to NYC for a week to learn not only more about their particular talent ( singing, dance, painting, etc.) but to also take a workshop about the business end of the professional artist. The painting event was led by world renowned St. Martin artist Sir @RowlandRichardson, who showed us how to paint a still life of three colors of bougainvillea in a simple jar vase.

We used exactly three colors–blue, red, yellow–and white to produce a lovely pallet of colors. Here is a photo of my work tonight. How many distinct colors can you see? Certainly more than the three we started with!

This is not to highlight my lack of talent with oil paint, but to show the influence of my Zentangle work and patterns on Zentangle-inspired art ( ZIA). In essence, I tangled a painting of real-life bougainvillea in a simple jar-style vase. Not only that, but it’s my first genuine still life work. That is, working from the real thing instead of a photo.

Note the number of poke leaf and flux in this painting, adding dimension to the simple patterns through how the paint was applied.

I will never be a famous artist, but I am really proud of this silly little piece encouraged by a famous artist, but completed because of the Zentangle Method®️. Tangling is so simple and versatile that it adds richness and texture to a piece that would have been completely flat and dull without my grasp of Zentangle patterns and techniques.

You may not be into Zentangle for the stress reduction, but if you are an artist, the method is definitely worth exploring for its patterns and unique shading techniques. I am proud to be a CZT (Certified Zentangle Teacher). Thank you, @MariaThomas and @RickRoberts! Without your influence, even a master artist like Sir @RolandRichardson could not have helped me do any better than apply dabs of color and hope for the best!

Happy tangling!

Posted in Zentangle

Hurricane Irma’s Anniversary is Past, Isaac on the Way…

We returned to Sint Maarten on May 1, with promises that our house would be ready for us. Instead, two months after staying in a rental condo because the only thing completed was a new roof (2nd in under a year!), we moved into a single room in our house with our 2 pets, a cat and a dog. We now have two bedrooms and baths, and a nearly completed kitchen. I have no idea when the dining and living rooms will be complete, but I am ready to toss everything that’s left of those two rooms (well, what survived of the dining room, anyway) and just purchase furnishings from scratch. I’m tired of sitting on armless chairs for which we can’t find room, as construction stuff takes up so much space. Today, after firing our first electrician a month ago, the replacement was forced to cut all the wiring just to access them–the previous guy not only drastically skimped on wiring (no wiggle room if anything went wrong) and placed 3/4 of the house on a single circuit. The last time I experienced anything like that was in my first house in the early 1970s that still contained the original rural wiring from the 1930s!

Some good news was that our second cat–he ran off after Irma and refused to come back–was reunited with us during the second week of August. He had been on his own for over ten months, was barely held together by skin and fur, and still took 3 days to lure home. Now he never leaves. After a check-up at the vet, we were all amazed that he was reasonably healthy. Of course, now he is always hungry! At least he looks like a real cat again instead of a Tim Burton character!

Today I tangled for the first time in a while. And it shows.

The shading is off, the simplest patterns wouldn’t emerge, not even using “first tile” tangles.

I don’t know whether I was more disappointed in the process or the result, as neither seemed to work out for me today. Yet, just a month ago I finished a project started several months back in the UK, to where we were transported after our evacuation after Irma’s devastation of our island of St. Martin a year ago. Here is the 9″x9″ sketchbook tangle.

Quite a difference, right?

Maybe today’s tangle went wrong because of the anticipation of Hurricane Isaac that’s following Irma’s path. I’m hoping Isaac stays relatively weak, as the repairs on our house after Irma haven’t been completed, and we have absolutely no hurricane shutters. Our contractor will be measuring for plywood tomorrow to give us some protection. That will be a great relief after Irma tore our old shutters apart.

If it’s not one thing, it’s another catastrophe skipping into our home, it seems. We are not the only ones with an incomplete home, but that doesn’t make us feel much better. I love this Island, but I just want to feel safe from hurricanes like Irma.

Until next time–hopefully my tangling will improve again!–I wish you happy tangling!

Anyone attending ZenAgain in Providence, RI, in November, shoot me a comment. I will be anxious to meet you. If you are part of the Zentangle Mosaic community, thank you for all the moral and supplies support during this interesting season of my life. Isn’t life supposed to settle down once you’re past 65?

Again, Happy Tangling!

Hugs to all,

Ellie (DrEllieCZT)

Posted in Zentangle

Back on the Island!

So much has happened during the past year–job, devastating hurricane, moving on two continents, quit job, and finally back on the island of St. Martin, but still not back in our Sint Maarten home.

You probably heard about the devastation caused by Hurricane Irma back in early September of 2017. She was the fiercest hurricane on record in the Atlantic and Caribbean. And she took aim at our Island of St. Martin and tore us to shreds. After six days of shelter at the American University of the Caribbean School of Medicine (AUC for short) we were evacuated to St. Kitt’s, where a sister veterinary school–Ross University–offered us shelter, a change of clothes, and medical attention for our pets. We spent two nights there before being further evacuated to O’Hare Airport and put up in two wonderful resorts–one week in one, five in another–while waiting for work visas to come through for (wait for it–) the U.K.

So many stories to tell, and they will come. However, I want to share the tangling I did while we still had power, even as roofing nails tore from the top of the house, and glass was curving and pulling out of sliding door frames.

These two were done as the storm raged over head. The tile below is one I tangled as the storm was merely anticipated.

Other tiles were lost to the water that eventually poured from our new glass-less skylights. Little seemed to survive the hurricane. We sat in our tiny kitchen with our next-door neighbors who rushed over during the calm hour-long eye–their home far worse than hours.

An hour or so after Irma moved on, security guards from AUC came looking for Professor Joe (my husband), and escorted us to the shelter of the school.

It was a while before I could tangle again. Aside from a lack of materials for the first few days (another story for another day), I simply was too shocked to do much except help where help was needed.

But more on the adventure in subsequent posts.

Wishing you health and safety,

Dr. Ellie, CZT