
Hello, Class!
Let’s finish that first tile. If you lost it, don’t worry. You can tangle on any paper, with any very fine marker type black pen, the darkest regular pencil you have or a 3B graphite drawing pencil, and a tortillion ( blending stump). At class, you used a black Pigma Micron PN pen with a .45mm tip and a General’s 3B graphite pencil. The tile is 100% cotton fiber watercolor paper. Instead of a blending stump, you can use a Q-Tip or other swab, or you can search YouTube for a video on how to make your own blending stump.
Here is where we left off, with Crescent Moon and Hollibaugh. For a quick refresher, click here.

Today, we will add the tangle patterns Bales and Tipple in the two remaining spaces.
(First, take a few deep cleansing breaths and relax all your muscles, especially the ones in your hands and arms.)
Bales is a grid pattern. That means it is worked in a grid.
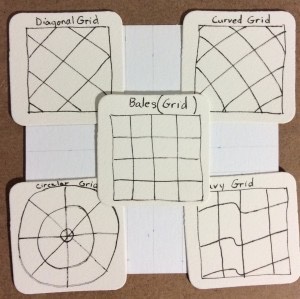
Grids can have all sorts of shapes, but we will start with the simplest one that is just lines going across and up and down.

The corner is where I added my simple grid. It’s not a full grid, but I wanted to show how we can use the under or behind technique of the Hollibaugh pattern with other patterns, too.
The Bales tangle, or pattern, can be drawn using the following step-out directions. There are several ways to draw the basic Bales pattern, but this is the one I use most often. It keeps my hand and pen moving in the same repetitive stroke, and so has a calming effect on me as I draw.

Now I am ready to fill my grid with Bales.

Before I shade this section, I will tangle the second pattern, Tipple, in the last unused space.
Here is the step-out for how I tangle Tipple. There are many ways to draw this pattern. The orbs can be all the same size, or all different sizes. Tipple orbs can be drawn in rows, in spirals, in rings, or randomly. The most important thing is to be mindful of how you draw the orbs so they are closed where you started them, and as close to round as you can make them. My choice today for drawing Tipple starts in the center of the space.

Notice that in the fourth step I went back and added small orbs in the spaces formed between circles or along the border. It is perfectly OK to draw half orbs along borders, too.
Here is how Tipple looks when added on my tile.

Finally, let’s shade Tipple and Bales. Starting with Tipple, pick up your graphite pencil and, using some of the side of the tip, lay a heavy border of graphite around the inside boundary of your drawing space. Then, using your tortillion and small, light circular motions, “pull” the graphite from the border into the space. Like this.

For Bales, use your pencil to make a large graphite dot where the “petals” touch. Using your tortillion with the same light, circular motion, draw out the graphite about 1/4 of the way along the petals. Like this.

When you are finished, your tile will look something like this–although you may have chosen to put your tangles in different spaces.

And you are done! Congratulations on completing your first Zentangle tile! Take some time to admire your work. Don’t critique it; there are no mistakes in Zentangle.
Feel free to share your results in the comments section of this post. I would love to see how you did, as would my readers. If you have any questions, the comments is a good place to put them. I usually respond the same day, as WordPress lets me know when a comment is waiting for me.
Until next time, whether in a class or here on my blog, Happy Tangling!
DrEllieCZT
Tangling from the wonderful island of St. Martin, in the country of Sint Maarten
