Posted in Zentangle

New-to-me Tangle: Skye

For a couple of weeks, I have been trying to chase down a lovely tangle by CZT Margaret Bremner called Skye. It reminds me of a Celtic knot in that it seems to be one continuous line.

[Update: A kind reader has found and sent the link to Margaret Bremner’s original step-out to Skye, which also features beautiful tiles tangled with Skye. Click here to access Margaret Bremner’s version, which is very similar to mine, but may be better/easier to use.]

Although there are several videos on YouTube (search term used: tangle pattern Skye), a Google search came up with no step-outs for Skye, regardless of search wording; and no step-out for Skye appears on TanglePatterns.com). And no matter how good the video, I kept messing up and really thought I needed the step-out to follow step by step without constantly having to pause and advance videos.

By the way, the YouTube video that I found most helpful can be found here. ( https://youtu.be/os0Js_gB0dw ) This tangle looks far more complex than it actually is, by the way. You will amaze yourself in the end.

Since searching yielded no step-out, I thought I would create my own, especially for when I need a reminder of how to tangle this pattern. Red lines indicate new additions.

This step-out is drawn in columns instead of the traditional tile-like steps. So, start with a column of backward Ss, leaving a little space between each one. Note that the top curve of the backward S is smaller than the lower curve. Next, the curve is auraed (haloed or replicated close by), starting outside the smaller curve and ending on the inside of the lower curve, in effect putting a larger curve at the top and a smaller one at the bottom.

Skye is a series of S curves, both backward and forward. They are “woven” using the Hollibaugh effect, the Zentangle term for drawing so it looks like something is going behind or under. A hint for this tangle is to draw the inside of the curved tubes first (right-hand line on the left side of the chain of backward Ss, left-hand line on the right side). This closes the backwards S tubes and helps guide the drawing of the lines.

Finally, connect the start of the tubed curve from nowhere under (behind) the bottom end of first backward S. At the bottom of the chain of backward Ss, and again starting under/behind, connect the top of the bottom backward S around the outside of the S, to the open tube left at the bottom of the fourth step-out column.

Some tanglers “get” this pattern right away. Others, like me, are distracted by openings to be Hollibaughed later, or some other reason; we have a more difficult time with this pattern. But once we get it, it becomes fun and really easy to tangle.

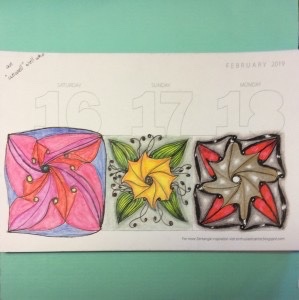
Skye can also be used as a string for tangling:

or (especially if you mess up like I did) become part of a background to be tangled over:

Hope my step-out of Margaret Bremner’s tangle Skye helps you enjoy this beautiful and flowing tangle. I am only starting to experiment with it. Hopefully I will soon be tangling variations and using it in more ways than I have illustrated here.

If you have any questions or suggestions regarding this step-out or Margaret Bremner’s pattern Skye, please leave a comment. I will do my best to address your comment. I am already working on a more detailed step-out that should need no verbal directions.

Until next time, Happy Tangling!

E.

Posted in Zentangle

Make a Tangling Calendar

Looking for a way to help you make time for tangling every day? How about a calendar?

There are two ways to go with tangling calendars: 1) buy an “official” Tangle-a-Day calendar created annually by Certified Zentangle Teacher (CZT) Carole Ohl (2019 calendar is US$ 22.50, plus shipping, available online from this vendor ) or make your own using a sketchbook (from about US$10.00 at art shops or office supply stores in Sint Maarten) or even unlined paper, if price is a major consideration). Top Carrot restaurant in Simpson Bay/Cole Bay has a beautiful assortment of sketchbooks from about $12 or $15.

Here are the cover and a sample tangling page from Carole Ohl’s calendar.

The spiral-bound calendar measures 5×8 inches, and is printed on a decent quality of drawing paper. The pre-drawn tangling spaces are about 2.5 inch square (about 6.5 cm) under the date. Many tanglers tangle the numbers, too, or increase the tangling space by simply tangling over the numbers as though they aren’t there because the lines are printed in gray to resemble graphite pencil. It is also easy to tangle two or three days together. Below are some examples from my own calendar, showing individually and multiply tangled squares on a page.

These calendars are really convenient for tangling each day, but have two drawbacks. First, the cost is fairly high. Second, if you tangle across multiple squares, you can’t erase the printed lines if they get in the way of your tangling, especially if you are using a large, open pattern. Certainly, you can cover the lines with ink or color pencils or pens. But if the pattern ends up straddling the line, sometimes even shading won’t cover them. I realized that today as I tangled this page, where the number lines cut right through parts of the tangling that I couldn’t or didn’t want to shade:

So I worked up a page in a sketchbook to sort of replicate the calendar using pencil to separate the days. The pencil can be blended into shading or erased from a string or pattern.

The approximate page size of this sketchbook is 15×21 cm, or about 6×8.25 inches. I measured off and centered across the page three blocks that measure about 2.5×2.5 inches (6.5×6.5 cm) near the bottom of the page, added an inch (2.5 cm) for the date numbers, and left the top open for the month name, if I want to add it. Everything is drawn in pencil so I can erase or blend in date or border lines if I want so they don’t interfere with whatever patterns I tangle there.

Like in the printed calendar, you can start the first of the month on a new page, or you can simply add it to the end of the previous month’s last page–especially for months with 31 days. In the printed calendar, the 31st day is always on its own page, with plenty of white space to keep tangling.

Although the printed calendar has some lovely tangles on a few separator pages, another drawback is that the pages are printed on both sides. If your tangle has large areas of black ink, or if you use markers or watercolors, there can be bleed-through to either the next page or to tangles you have already drawn. Creating your own calendar gives you the option to choose whether your pages are one-sided or two-sided. If you decide to use one-sided pages, make sure your sketchbook has more than 120 sheets, or buy two sketchbooks, or choose a larger size sketchbook that allows you to draw more calendar squares on a page.

That’s all there is to creating your own beautiful tangle-a-day type calendar!

Good luck!

Until next time, happy tangling!

Dr Ellie, CZT

Posted in Zentangle

A Wonderful Class at MHF Last Evening!

Wow! What a terrific Zentangle class last night at MHF!

Seven students and a staff member participated and produced these fabulous First Tiles.

Tangled on a Z string, each fabulous individual tile produced this beautiful mosaic of their unique styles.

We started with Crescent Moon for the auras and Hollibaugh for the under/behind technique. Then we went on to Printemps (spring) and finished with the grid tangle Florz. We used the new Micron PN pens and, of course, the traditional Zentangle 2B artist pencil. Because I was afraid we would run out of time, we shaded each pattern as we finished it, and used the tortillion to smooth out the graphite shading in various ways.

Unfortunately, we did not have the opportunity to hear Rick Roberts’ “Zentangle Sounds” album, as the PC we were using didn’t seem to want to play anything. However, I think my voice is soporific enough to soothe, and it certainly kept everyone working. Admittedly, I get so into the Zentangle Method®️ when I teach a class that I mellow out and almost– only almost– forget there are others in the room. Next time we will have the soothing original music playing.

I so enjoyed working with this group of people who were so certain they didn’t know how to draw. Gladly, each was proud of the tile he or she produced. Wonderful group, fabulous participants!

Until next time, tangle on!

Dr. Ellie, CZT