Posted in Zentangle

My First Attempt at Tangling Embossed Stamped Images

Last time, I shared my first attempt at combining Zentangle with die-cut shapes and using the same dies to emboss paper for further tangling. The type of embossing I did was basically molding paper around a figure that would raise the design from the paper.

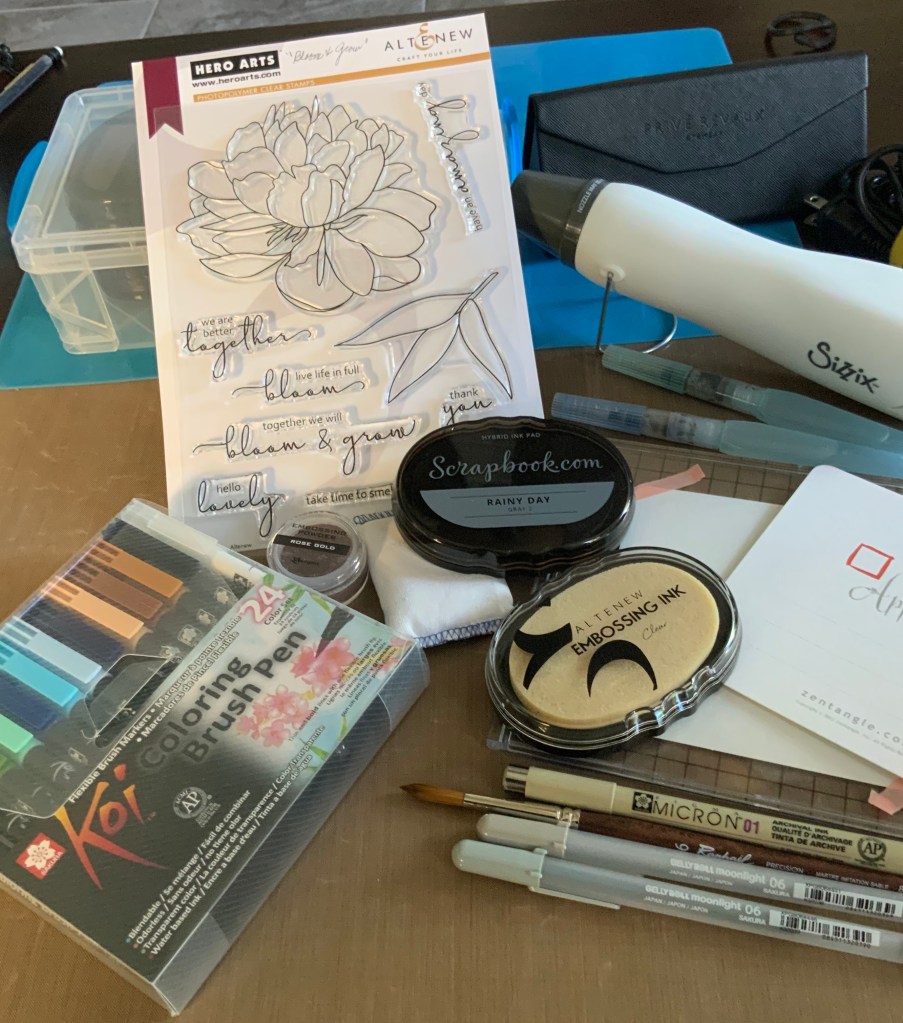
Today, I played with a different kind of embossing. This method, which I have seen referred to as heat embossing, requires beautiful stamps (usually clear acrylic), a pad of clear embossing ink (thicker and dries more slowly than regular stamp pad ink), embossing powder, a crafting heat gun (workshop heat guns run too hot), and a bunch of little crafting and embossing tools that you don’t always hear about but are extremely helpful.

Helpful hint: When stamping, smooth card stock is a better choice than watercolor paper, even if you plan to add watercolor touches later. Unless you are planning to build an elaborate wet-on-wet watercolor painting around your stamped and embossed image, card stock stands up pretty well to watercolor techniques that don’t require rivers of water.

These are the supplies I used for my new project: Acrylic stamps, a stamping block, a stamp pad of pale gray or black or other color ink, clear embossing ink, a Micron 01 in black for tangling, watercolor brush pens, one or two water brushes filled with fresh clean water, embossing powder in your choice of either clear or color (even black), a small dry regular paint brush, gray brush pens and/or gel pens and/or graphite pencil for shading, and a craft heat gun.
You may also want to have a container of clear water for rinsing water brushes, and some paper towels or a cloth in case you get too much water on your brush or paper.

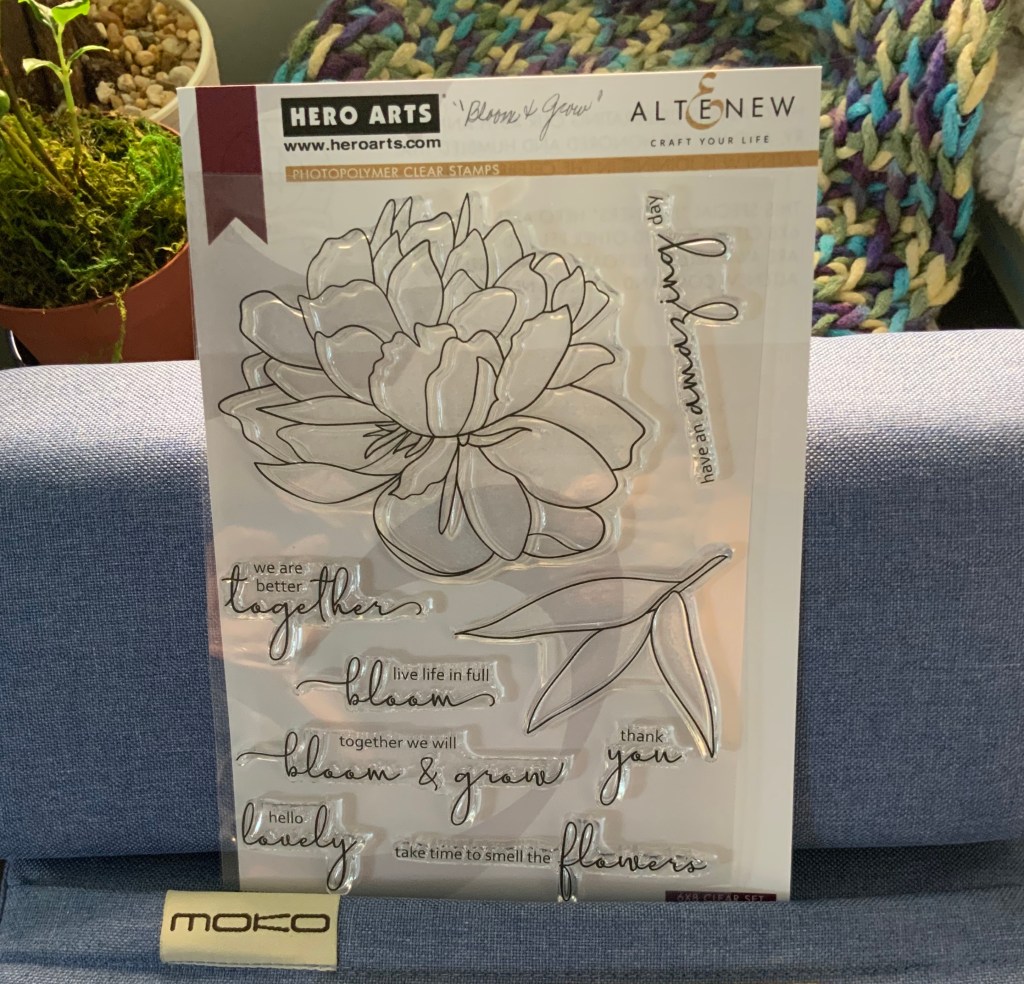
The stamp I selected for my project is from a stamp set called Bloom and Grow, which was a joint project between Hero Art and Altenew. The set contains a flower that measures about 4×4 inches, with a separate leaf stamp and several sentiments. Here is a closer look at the set.

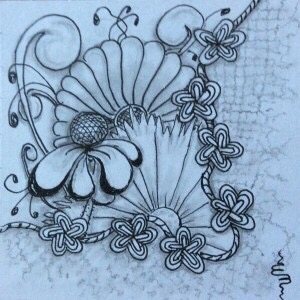
Because of the size of the flower, I decided to use a Zentangle Apprentice tile, which, at 4.5”x4.5”, is much smoother and larger than the traditional Zentangle 3.5”x3.5” tile — and the stamp fits on it so I don’t need to cut down a sheet of card stock.

After placing the tile on a grid-lined generic hinged stamper base, I arranged the stamp where I wanted it, closed the lid on the stamper, and let the cling stamp affix itself to the underside of the lid. Next, I inked the stamp, using a pale gray stamp pad because I wasn’t sure what I wanted to do. I used Rainy Day ink from Scrapbook.com , which gave me a pale imprint of the flower.

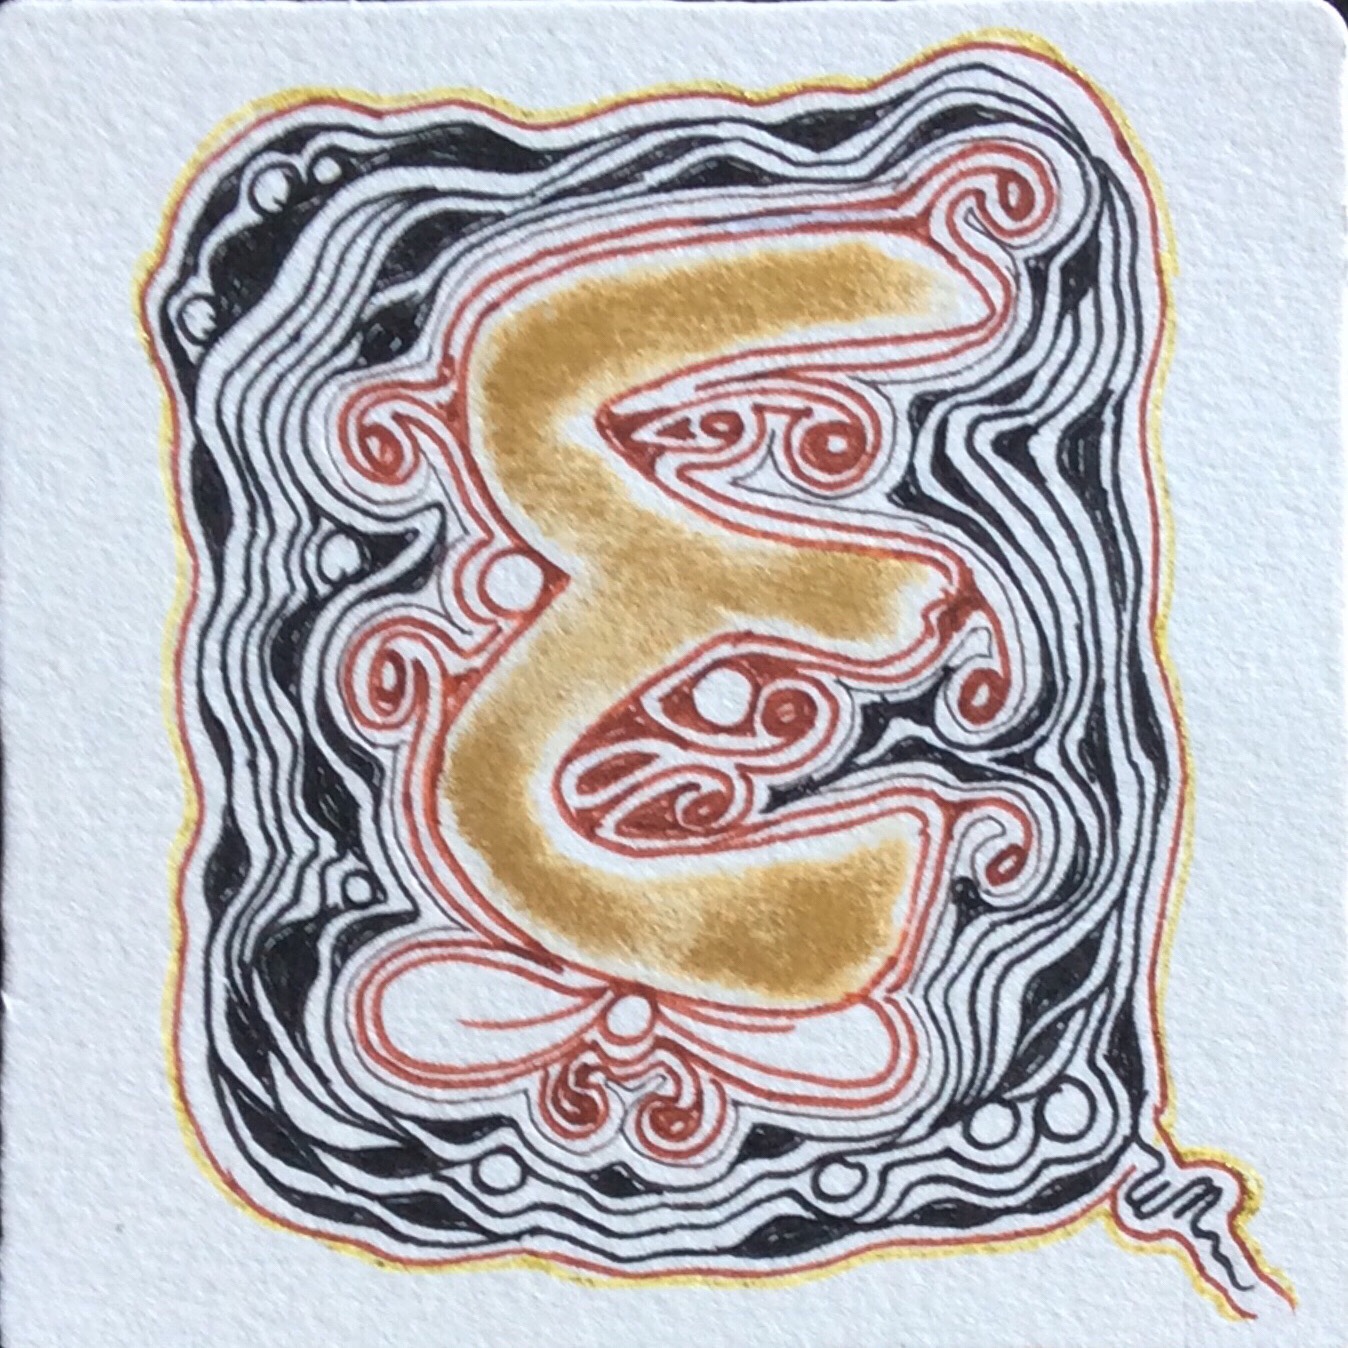
It took me a while to decide what I wanted to try next. Did I want to tangle the petals? Or did I want to paint them? If I tangled them, did I want to use the black or a colored Micron 01? Did I want to use one or two tangle patterns for the whole flower, or did I want to tangle each petal differently? Did I want to control shading with the density of the patterns, or would I simply tangle at will and shade afterwards?

What I did was tangle each petal differently. I varied density on some petals, and left others to be more traditionally shaded. Using Koi Coloring Brush Pens, I colored the petals, laying down water or using it after color to vary color intensity. As much as possible, I shaded as I painted, adding more shading at the end as it seemed needed. The combination of color and shade added some dimension to the image.

Once the color on the card stock was dry, I re-aligned the clear stamp on the printed one and put them both back into the hinged stamper. After wiping the prepared card stock surface with an anti-static bag (a sprinkle of cornstarch or baby powder works just as well), I inked the stamp well with clear embossing ink. Next, I sprinkled Ranger Embossing Powder in Rose Gold all over the inked surface. I slid the excess powder from the tile onto a sheet of paper and funneled the extra powder back into its jar.

Next, I pre-heated the heat tool. Once it was hot, I directed the hot air toward the embossing powder clinging to the embossing ink. The powder melted into a gold line image of the original stamping, adding a bit more dimension to the flower. Where needed, I added some deeper gray to deepen the shadows, especially around areas where the embossing seemed to take away some depth.

Finally, I hand added a few leaves and colored them. Finally, the tile was finished!

If you look closely, you can see the raised gold line embossed around each petal.

As our Sint Maarten lockdown continues, I will be sharing more of my experiments with tangling and paper crafts. Please join me on this Re-directed journey of discovery. And…

Happy Tangling!

A

Posted in Zentangle

Embedded Letters

So, it’s the last day of 2019, and I have been thinking about high focus tangling. A lot.

A tangle pattern does not need to be difficult to be high focus. Any stroke or combination that is difficult for you (not necessarily for someone else) is high focus, at least initially. For me, any pattern that requires auras is high focus. Even when I maintain my focus, strokes don’t always come out the way I want them to. But that’s OK, because there are no mistakes with Zentangle.

One of the loveliest projects to come out of Zentangle HQ is something called Embedded Letters, tagged #EmbeddedLetters. This project relies heavily on auras. Interestingly enough, even if the auras aren’t perfect, and even without shading, the result is lovely. Here are a few examples of my own embedded letters.

As you can see, they are not perfect, yet the people for whom they were created seem to love them. And I have gone on to embed whole names.

Here is how to get started with your own embedded letters project.

1. Create an outline of the letter (or word) you want to embed.

2. Fill in the outline.

3. Aura around the filled letter(s).

4. Add some embellishments. The easiest is to add a few fescue around the edge. Weight the bottom of the fescue to give it a feel of old fashioned engraving. Add as many as you like, wherever you like.

5. Aura around that embellished layer.

6. Add another layer of embellishments, maybe adding some flux and perfs (or pearls) to fill in spots too small to add other patterns to. Then aura that. Or just add several auras. As you gain confidence, add bits of other patterns. Whatever you do will look great.

Lastly, shade as desired–or don’t shade at all. Either way, you have completed a project that took a bit of focus, a few simple strokes, and a lot of yourself.

Tangling isn’t difficult, but it does take mindfulness to keep strokes even or balanced. The mindfulness is meditative and relaxing. Using the whole 8-step Zentangle Method, from gratitude for time, place, materials in step 1, to appreciation of your accomplishment in step 8, helps to calm your anxieties and stress, at least for a little while.

Happy 2020 to you and yours. As always, Happy Tangling!

#

Posted in Zentangle

Back on Track

I am afraid to look at when I posted my last blog. Please forgive my long absence. It’s been a roller coaster ride for over two years. We’ve finally finished the rebuilding of our home, and are still putting finishing touches on it. One project I’ve been working on is creating lots of Opus tiles (3 standard tiles wide by three high) and those are coming along slowly because they are in color, and I am learning about art and color theories as I go along.

Here is the unframed version of my first Very own Opus tile–and the framed version is nothing short of fabulous.

Patterns: Waybop, Poke Leaf, Perk, Henna Drum, Knightsbridge, Printemps…

This is the first of at least four, all different, all sharing one or more elements, all only partially complete. As I said, I research and learn art techniques as I need them–because I was not trained in art–but they will all be used in future work.

Today’s post is to let you know I am back–no patterns or techniques to share. But that is only today.

Follow me on my journey of mindful meditation through learning and rebuilding. As I learn, the information I am allowed to share will be shared with you, my readers. Whether those are new tangle patterns or tangling embellishments, or whether they are art tips and “tricks,” all will be presented here a bit at a time.

Meanwhile, taking a page or two from several of my tangling friends, I am considering giving live and taped (Incase you miss the live one) online classes. What are your thoughts? Would you be interested in something like that? Et me know what you think, and what you would like to learn if you are interested in online classes. Just say something in the comments section below, and maybe we can get some discussions going.

So glad to be back and feeling artistic again!

Until next time, keep on tangling!

## @DrEllieCZT @educ_dr

Posted in Zentangle

New Tangle: Frenot

This new tangle is one I have been using for several months, calling it Frenot. I haven’t posted a step-out before, mostly because I was not sure it is unique. Now, I am pretty certain it is something new.

Frenot  was inspired by the French knot in embroidery work. While unpacking from our move last year, I came across a tiny piece I started years and years ago but never finished. One stitch that was used in it was the French knot. There was a cluster of French knots, creating a ring of petals or blooms. It inspired me to create a tangled interpretation. Being completely new to Zentangle, I didn’t know that anyone can create and name a tangle. Although I used it in some of my tiles, I was afraid to share those tiles because they contained an “unknown” pattern.  It took a while to realize that 1) anyone can create a new pattern; and 2) it is unique, as far as I can tell. 

Although I have been tangling for more than ten months now, I have been working pretty much on my own. That’s why I continue to call myself a newbie or beginner. I have learned so much! There is still so much to learn! Recently, however, I have had a lot of Zentangle-related help from several lovely people on the Zentangle Mosaic app (iPhone/iPad and Android formats available). No one has been more of a help and inspiration to me than Jody Genovese, CZT. It is thanks in large part to Jody’s encouragement on my tangling explorations and experiments that I have gained confidence–in my ability to tangle, and in my willingness to share. So I dedicate this new pattern to her. 

Here is the step-out for Frenot.

Step-out for new tangle pattern Frenot

Here are a few tiles on which I used Frenot. Two of them I shared on Mosaic. 


If you like Frenot and use it in a tile or other work, please feel free to include a photo or a link in the comments section. I would love to see how you use it! 

Until next time,

Happy Tangling!

Posted in Zentangle

Inspired to Create

Inspired by Yoga for Your Brain (see earlier post, InTheMail), I created a new tangle. I don’t have a picture of the photo that inspired me, but I found it while looking through a magazine in the doctor’s waiting room. The article and photos dealt with an architectural dig in Central America. I was surprised to find a tangle pattern among the ancient artifacts!

It was two days before I recorded what I saw as a potential Zentangle pattern. To my eye, it functions best as a grid or border tangle.

My new pattern, Stonework.

 This picture shows a hurriedly drawn grid with a few minor differences in the basic pattern–shading, rounding, rotation. I think it might also work well as a background pattern, but we’ll see what I come up with. 

If you want to try it, here is the step-out. Stonework step-out

For me, I start diagonal ovals and rounded strokes with rounding off the corners. Part of the reason is that my astigmatism causes distortion of lines for me. It is easier to connect two points than to try to figure out where to start curving–I am almost always wrong when I try to guesstimate. In drawing the smaller oblongs, I start with the longest, basically doing the same thing as for the diagonal with the rounded ends. The rest of the row is just elongated C’s, followed by a circle. Finally, I either round (fill in) around the ends or shade. 

When the pattern is used in a grid with rotated diagonals, the effect can be flower-like. As a border, the patterns can all go in the same direction, or the direction can be rotated. In corners, the pattern can be “mitered,” especially if the horizontals and verticals are drawn in different rotations. 

Before creating the step-out and naming the pattern, I checked through all the patterns in TanglePatterns.com’s latest e-book catalog (2017) called Presenting … The Tangles. To the best of my ability to discriminate, this tangle is unique. Two or three patterns might be roughly similar, but none share more than one characteristic with Stonework. One pattern has stacked oblongs, but they are all the same size. Another pattern has a diagonal oblong, but no vertical or horizontal ones. That’s as close as other patterns came to this one. 

Please let me know if Stonework is the same as another pattern. Zentangle is an international community, and not all countries share tangles. I have seen tangles on various web sites online that are identical but share several different names. At the very least, I would like to share the names of the patterns for cross-reference. 

If you use this pattern, please leave a comment and a picture or link to where it is posted. Thanks!

Happy Tangling! 

Posted in Zentangle

Growing Into Tangling

Browsing through my album of tiles and my sketchbooks over the weekend was an interesting and surprising experience. I have been tangling since the end of April, 2016–about 10 months. What I saw was growth as well as regression–typical of any learning progress. When my work became more attractive, the same patterns and techniques appeared in a cluster. During times of learning new techniques and patterns, the work became cluttered or less cleanly drawn. The pattern kept repeating in cycles, only now becoming less extreme in its swings. 

One of my first tangles, late April, 2016. I thought this was so cool! I knew only 9 patterns then, and I included them all!
Today’s morning meditation is cheerier, more confident, with a pattern or two learned in the past week. I can confidently draw over 100 patterns now, am familiar with a couple hundred more, and I keep learning a new one or two each day. Only 7 patterns were used.

If you look at the tangles above, you can see that, in my early tile, what I lacked in pattern skills I tried to hide behind a bit of flare. Today’s tile is less stilted. Whether it is more pleasant to view is not my call, but I find it more breezy, better developed, and stronger, even though two of the patterns used here are out of my sketchbook and on a tile for the first time.

To be honest, I have no inate artistic talent or abilities, and it is only about three years since I learned to produce any art at all. I took up drawing lessons to learn to see things as an artist might, and had limited success. My teacher suggested switching to acrylics (I’m too  slow) or oils (which I feared). I even picked up watercolor books and videos and tried to learn that, only to discover that watercolor presents its own unique set of challenges. Then, less than a year ago, I learned about Zentangle. 

I had been looking for a method of meditation and relaxation that involved movement. Although Tai Chi was an option, I couldn’t find classes here on the island–not then, anyway. Besides, going to a Tai Chi class would have involved getting into the car and searching for parking–not very conducive to relaxation. 

“Zentangle” was a term I remembered referenced in several of my art how-to books. I thought at first it was some new professional school or method of art. Then I found out it isn’t art in the traditional sense at all–it’s Zentangle, pure and simple. That it centers around drawing is a good thing, I thought to myself. That it can be done by even the most artistically challenged is even better! So I researched more. 

Although certified Zentangle teachers (CZTs) can be found all over the world–increasingly in China and India–none seem to be in Sint Maarten, the tiny island (well, half-island) country in the Caribbean. So I ordered a book or two from Amazon and set out to see if I could teach myself. I spent well over 20 years teaching children and young men and women professionally. Surely I could teach myself, too.

And I did teach myself Zentangle, of a sort. On the official Zentangle site, Zentangle.com, the recommendation is to learn the Zentangle method from a CTZ through a workshop. The second best way to learn is by purchasing the Zentangle Primer, Volume 1, and the Zentangle starter kit, both available for purchase on the web official site. After months of trying with other sources, I broke down and purchased both. Not only did I wish I had done that from the beginning, but I also decided that, because Zentangle was so helpful to me, I wanted to bring Zentangle to this tiny island. In two months, I will be attending a Zentangle seminar to become a CZT so I can do just that. 

My copy of The Zentangle Primer gets used almost every day. I may never get to all the ideas inside! The book contains step-outs for dozens of patterns that make the complex easy to draw and embellish, as well as dozens of sample “fragments” to develop and “reticula” ideas for grid tangles and strings.

Here’s the thing: I may not have started off with the best self-teaching materials, but I did start off with an excellent resource, One Zentangle a Day, a book by Beckah Krahula, CZT.

My well-used copy that contains six weeks of lessons and about 75 patterns with step by step directions.
It gave me enough information and techniques to get me started, even if I became frustrated sometimes. As a beginner’s reference, it is a great book, especially if you are looking for at least a little of the mindfulness and relaxation benefits. It contains a lot of information for trying Zentangle on for size, but it doesn’t cover Zentangle principles in depth. A great “first” book at low cost. If all you are looking for is art or crafting ideas, it is also a great source of ideas and buying information. But for a deeper understanding of the Zentangle method and its effects on calming your mind and increasing both focus and creativity–and if you want a book that will continue to be a resource for years to come–then The Zentangle Primer is a must-have book. 

For me, a helpful resource is an app called Zentangle Mosaic, available in Apple iPad and iPhone format, as well as in Android format. It is an excellent source of inspiration, tips, and friendly and supportive members from all over the world. Many well-known and respected CZTs share their work on the app regularly. Many up-and-coming CZTs participate and provide advice and support. Zentangle founders Rick Roberts and Maria Thomas share their own work, new ideas, and even exclusive videos there. Rick, Maria, and their family interact with members all the time, providing feedback and encouragement, especially to new tanglers. It is a marvelous community of tanglers. Posted work is validated for its “Zentagleness” (my word). There is a free option, if all you want from the app is inspiration, and a paid option, which allows you to upload photos of your work and actively communicate with Mosaic subscribers. I don’t know enough about the free version to compare it to the paid subscription, but I believe that, as lovely as the free version is for viewing others’ work, the most useful features come only with membership. To me, the benefits I derived from the paid subscription is priceless, especially since I tangle alone here on the island. 

 Encouragement from members of Mosaic got me participating in national and international challenges on Facebook and blog sites. The challenges are not as supportive as Mosaic, but I have learned to judge tangles on “Zentangleness” instead of eye candy. Many challenge submissions are Zentangle Inspired Art, which can be beautiful and whimsical, but a lot are by professional artists. They each have something to teach, though, even if the intention is not there. There are many artsy and craft ideas presented by challenge participants. Mindful tangling is difficult to put out there when one is not an artist. My tangling may not compete in artistry, but it solidly represents the Zentangle method and purpose. After one or two posts, I was no longer intimidated by the pros. For an example of a short (two-week) challenge, visit “valentangle2017” on Facebook. It came with a book of instructions for what to include in each day’s tile, along with lovely examples to use as models. The contributor pool was just over 200 participants–small by Facebook standards. Lots of beautiful work on display, though. 

All of these resources have helped me grow as a tangler. I firmly believe, however, that workshops are the best way to learn Zentangle. When I tangle alone, even with supportive online communities available, it’s difficult to get questions answered or discussions on techniques moving smoothly. There is something about face-to-face contact that helps those of us seeking the mindfulness and meditative aspects of Zentangle. Hopefully, I won’t be tangling “alone” on the island for much longer! 

Happy tangling! 

Posted in Art, Zentangle

Color My World Blue!

It was a picture-perfect Caribbean day this afternoon–deep blue sky, lagoon waters more blue than green for a change, and light just seemed to flow all around, even in the shade of a rom open to the sky.

I had just finished tangling another tile, and was photographing it for upload to the Zentangle Mosaic app when I noticed the iPad was turning the picture blue. This had happened once before in recent weeks, and I hadn’t noticed the color until it was too late. This time, I did notice a very pale blue tint to the photo, and took the photo again. And again. And … We’ll, you get the picture. I tried moving outdoors–same blue. I moved to a different room–blue. And then I noticed all the shadows indoors and out had a definite blue tinge. 

An hour later, and long after I posted the tile, the blue was gone. 

Normally, I am pretty aware of light–it’s color, it’s texture, it’s luminosity, if you will. So I am not sure why I paid so little attention to changes in light color since moving to the island four years ago. Thankfully, today I did notice, and this will change how I perceive the island forever. 

Latitude, as one friend suggested? Reflection of ocean and sky? Just the right weather conditions?  A mix of these and more? Something new to research and explore as I tangle away. 

The tile here was part of a sort of challenge on the Zentangle Mosaic app by the founders of Zentangle. The idea is that we all run into stumbling blocks occasionally regarding what to tangle. The suggestion was to draw a frame that is far from the edges. Next step, aura it–outline it bigger on the outside. Next, draw a Mooka pattern–or a Zinger or other “long-stemmed” pattern starting at an interior corner and moving behind the frame so its “head” rests on top. Then embellish. Just a few simple steps to start the creative juices flowing. Before you know it, you have a completed tangle! 

When I draw challenges or challenge-like tangles, I like to keep things very simple. If I don’t, i keep adding elements until the pattern looks cluttered. Maybe that’s a reflection of what is going on internally, but I don’t always like the effect of dumping my clutter onto a tile. So I minimize. The benefits of meditation are still there, as I still need to focus and concentrate to keep lines straight and relatively even distances. But I stop long before I might if tangling completely from my own mind with no suggestions from outside. 

We each have our own style of tangling, especially under unique situations. This is my “challenge style.” And sometimes it turns blue. 

Posted in Art, Zentangle

A Sleepless Night

The night before last, I got no sleep. Zero minutes of sleep. None. 

Although insomnia hits me often–averaging every second night–I usually get at least two hours of sleep in. I know this because my Fitbit tells me so. But that night, nothing was allowing me to fall asleep.

Why am I telling you this? Because something interesting occurred and was “recorded” by my Fitbit: for the hour or so of tangling to help me relax, the app decided that all it’s measurements showed I had slept for 49 consecutive minutes! 


No, I wasn’t actually sleeping during that time. I was tangling, and was apparently deep enough into a relaxed, meditative state that Fitbit believed I was asleep. Since I have my sleep measures set to “sensitive,” the device doesn’t count any periods of movement of any kind as sleep time. It calls it restless time, possibly because the app has no way of knowing if I am simply in a less deep state of sleep or if I am in a waking-up state. So it does not count those periods as sleep. Since it is hard to draw without moving, all my other body signs must have fooled the app into thinking I was in an actual sleep state. 

Even though I already experience the restful nature of Zentangle, it was both surprising and welcoming to have the meditation state and time confirmed by a scientific device. Just another reason to tangle on! 

Posted in Zentangle

My Way Bop Examples

Yesterday I posted the official public step-out for the Zentangle® called Way Bop. I included a few of my first attempts. Today I am posting photos of two more I tangled today

The first one is drawn on a black square tile, using a white Gelly Roll™ pen for the design and General’s Charcoal White™ pencil for shading. 
The second tile is a “pre-strung” Zendala® tile. That means it comes with strings already on the tile. The string breaks the tile up into smaller drawing/coloring areas. For the basic structure of the Way Bop, I “jumped the fence” (ignored the lines) a lot. Then I jumped a lot more fences to fill in with other Zentangle designs. 

Imagine what you can do! 

Remember: Anything is possible one stroke at a time! ®

Posted in Art, Zentangle

A New Zentangle: Way Bop

For some time, I have been seeing a wonderful pattern drawn by CZTs (Certified Zentangle Teachers) appearing in the Zentangle Mosaic app on my iPad. It is intricate, beautiful, and full of tangling possibilities. The tangle is called Way Bop, an interesting name selected during a CZT-only event in 2016, when it was first introduced. Often, when Zentangle puts out a brand new pattern, the step-out is first provided only to CZTs to teach in their own workshops. After a while, the step-out is made available to everyone else. 

Some patterns are relatively easy to deconstruct. This was not one of them for me, and I was delighted when the step-out was made public this past week in the Zentangle blog newsletter (click to view it). Along with it came a variation with a heart motif for Valentine’s Day. If you are an avid tangler and subscribe to the Zentangle app for iOS or Android, you also have access to an exclusive video showing founder Maria Thomas drawing and embellishing this pattern while founder Rick Roberts narrates. 

Because this is still a very new pattern for me, my interpretations are still elementary and awkward. Despite this, my attempts are not too bad–not as elegant as they may later become, and lacking any great artistic qualities, but pleasant and intricate enough for early tries. 

The one on the right was drawn as a Valentine, based on the heart variation step-out of Way Bop. On the left is a first shot at something more intricate than the simplest result.

Looks difficult, doesn’t it? Well, here are copies of the Step-outs from the newsletter to show you how easy this pattern becomes once the steps are logically presented. Just follow the arrows! 

Way Bop Step-out
Heart Variation of Way Bop

The spaces created by the Way Bop pattern can be filled with other patterns, surrounded by tangles and embellishments, colored in–so many possibilities! 

For a recent 14-day FaceBook-based Zentangle challenge for Valentine’s Day (search with Valentangle2017), I tangled an impression of my home here in Sint Maarten. I had been playing with Way Bop for less than an hour when I drew this as a meditation in my sketchbook. It shows the garden, the view of the lagoon, and the “rippled tile” tin roof. The challenge theme was “Home is where the heart is.” 

Just drawing this pattern is soothing and meditative. Adding elements to enhance the tangle is challenging, fun, and meditative in its own right. 

If you are on the island of St. Martin in the Caribbean, as resident or visitor, feel free to contact me. In two months, I will be attending a certification seminar in Rhode Island, earning my certification. I will return home to my island as a CZT, ready to spread Zentangle to everyone who wants a meditative methodology that results in a small work of art, especially to those who are convinced they can’t draw. I can’t draw, but I can tangle! 

My Island Home: “Home is where the heart is.”